Outbound Emails
Overview
The Outbound Emails feature enables you to connect a shared email address (e.g., your company's email) to Kinabase using Microsoft Azure. Once set up, you can send bulk emails directly to your contacts lists within Kinabase.
For example, if you have a 'Contacts' collection in Kinabase, you can easily select the contacts you want to reach and send bulk emails from within the platform. This integration enhances Kinabase as your central information hub, streamlining communication workflows for greater efficiency.
Step 1: Setting Up Outbound Emails
To send emails through Kinabase, follow these steps:
Connecting an Email Address
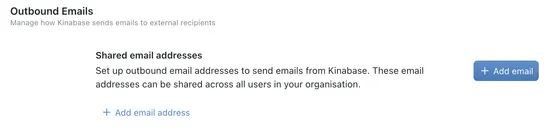
- Navigate to Settings in Kinabase.
- Under Integrations, select Outbound Emails.

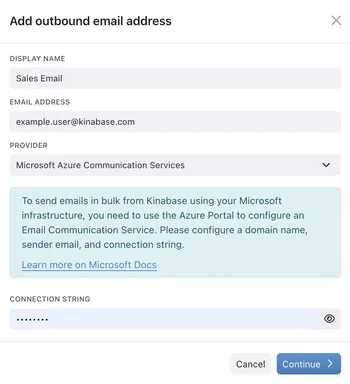
- Click + Add Email and provide the following details:
- Display Name: The name recipients will see.
- Email Address: The shared email address to connect.
- Provider: Currently, only Microsoft Azure Communication Services is supported.
- Connection String: This is used to authenticate with Azure. Find your connection string in the Azure portal, or follow Microsoft's guide for Azure Communication Services to find it.
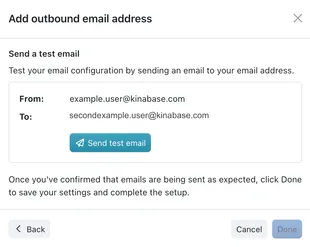
- Send a test email to confirm successful configuration.
Need help with Azure? Explore Microsoft's official guide: Create an Email Communication Resource.
Step 2: Sending Outbound Emails
Once your email is set up, you can send emails directly from a Kinabase collection. Here's how:
- Open the relevant collection (e.g., 'Contacts').
- In the toolbar, click the Options Menu (⋯) and open Configure.
- Under features, open Email.
- Click to 'Add Shared Emails'. Choose which emails you'd like to be able to send from in this collection (e.g., a sales email in an 'Opportunities' collection, or a support email in a 'Support Tickets' collection).
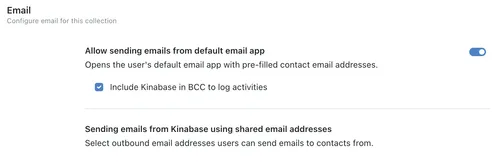
Note: You can update your Permissions options to decide who can send outbound emails from Kinabase using shared email addresses.
- Exit configure settings and select the records you'd like to email. To select all records, tick the checkbox at the top of the screen.
Note: Ensure the selected records include valid email addresses.
- In the bottom selection bar, click the Options Menu (⋯) and choose Send Email.

- Select the sender:
- From Me: Use your personal email.
- Shared Email Address: Use the connected shared email.
- Follow the instructions to compose your email, and hit Send when you're ready.
That's it! Your email will be sent, and you can continue managing your communications effortlessly within Kinabase.